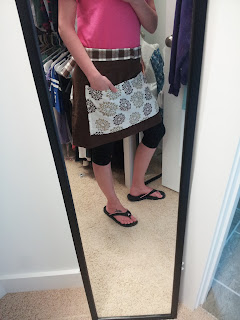
Dish Cloth Apron
I saw this on Pinterest as well. I hate wearing over the head wrap around aprons. The only aprons I've purchased or inherited, were thin and made of some type of material that does not absorb very well. Don't get me wrong, they do their job as far as protecting your clothes from major messes. I saw this on Pinterest as something you can buy at Williams Sonoma, or some place like that. It really struck me as more useful than your average apron. I am always looking for towels when I am cooking. I wash my hands from cracking open eggs and then throw my towel somewhere on the way back to the mixer. I go back to wash a dish or rinse my hands, and hmm... where did I throw that towel? I am the same way with my phone. I use a lot of recipes from the internet and hence use my phone while cooking. I am always misplacing that thing in the midst of my cooking!
This apron, I have used while cooking and love it! It serves as my towel and my "phone keeper."
With a sewing machine, this takes no time at all to make these! I bought a three pack of towels from Ross for $4 to make these!
Towel Apron
1. Choose one of the towels to use as your base or main portion of the apron.
2. Choose a second towel to use as the pocket. I cut the towel in half to form this pocket and pinned it down to the base towel. I then sewed along the edges leaving the top portion open. I then sewed a line down the middle of the pocket to make two separate pockets.
3. The third towel I used as the "tie" portion of the apron. I cut the third towel into two long portions and sewed the edges together. We are going to make a tube as the tie and end up sewing it to the base.
4. I then opened the towel piece
5. Fold the towel long-ways so the backs are out. I pinned the edges together and then sewed along the long edge.
6. After the edges are sewn together, you have an inside out tube. Turn the tube inside out. Pin the tie strip centered to the base. Sew along the top and the bottom of the tie strip, so the tie is now attached to the base.
There ya have it! Pretty simple to make and very very handy!


Comments
Post a Comment